Spread the love

Transforming your bathroom from a purely functional area into a tranquil, spa-like sanctuary often comes down to the details. One of the most effective yet budget-friendly ways to achieve this is through thoughtful and stylish shelving. Whether your aesthetic leans toward modern minimalism, rustic warmth, or bohemian luxury, the right bathroom shelves do more than just hold your essentials—they tell a story.

This comprehensive guide explores 20 gorgeous, Pinterest-ready bathroom shelf ideas. Each concept includes a detailed introduction, a breakdown of what the style means, step-by-step DIY instructions, essential tips, creative variations, and everything you need to bring the look to life.

1. Minimalist Floating Concrete Shelves

Introduction

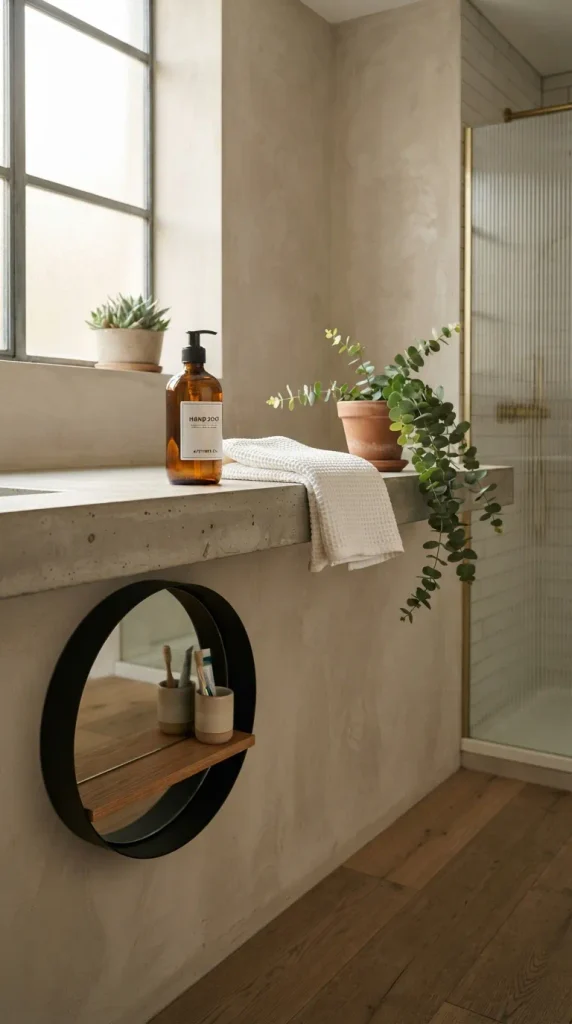
Clean lines, industrial edge, and understated elegance define the minimalist floating concrete shelf. Perfect for modern or contemporary bathrooms, these shelves offer a sleek surface that feels both architectural and effortlessly chic.

What This Idea Means

Minimalist floating shelves strip away all visible hardware, creating the illusion that a solid block of concrete is emerging seamlessly from the wall. It represents a commitment to simplicity, where every displayed item—from a single amber glass soap dispenser to a folded linen hand towel—is chosen with intentionality.

How to Make It

  • Materials Needed: Wooden board (for the mold), concrete mix, water, mixing bucket, trowel, heavy-duty hidden floating shelf brackets, wall anchors, and a drill.
  • Step-by-Step Instructions:
    1. Construct a shallow wooden mold matching your desired shelf dimensions (e.g., 24 inches long, 6 inches deep, 1.5 inches thick).
    2. Mix the concrete according to package instructions until it reaches a thick, pourable oatmeal consistency.
    3. Pour half the mixture into the mold, lay your metal bracket mounting sleeve or reinforcing mesh inside, and pour the remaining concrete on top.
    4. Tap the sides of the mold gently with a mallet to release trapped air bubbles.
    5. Allow the concrete to cure for 48 hours before carefully dismantling the mold. Sand any rough edges with fine-grit sandpaper.
    6. Secure the heavy-duty mounting hardware directly into your bathroom wall studs, slide the concrete shelf over the bracket, and secure it in place.

Tips and Variations

  • Sealing: Always apply a matte concrete sealer to prevent water absorption and cosmetic staining from humidity.
  • Variation: Tint the concrete mix with a dark charcoal pigment for a moody, high-contrast industrial look against white or beige tiles.
2. Rustic Reclaimed Wood with Black Iron Brackets

Introduction

Infuse your bathroom with warmth and timeless charm using reclaimed wood paired with matte black iron brackets. This combination bridges the gap between farmhouse comfort and modern industrial design.

What This Idea Means

Reclaimed wood brings history and texture into a space that often features cold surfaces like tile and porcelain. Each knot, grain pattern, and weathered mark tells a unique story, making your bathroom feel grounded, cozy, and deeply personal.

How to Make It

  • Materials Needed: Reclaimed wood plank (cut to size), two L-shaped iron brackets, sandpaper, wood stain or clear polyurethane, wall screws, anchors, and a stud finder.
  • Step-by-Step Instructions:
    1. Sand your reclaimed wood plank thoroughly to remove splinters while preserving the rustic texture and character marks.
    2. Wipe away all dust and apply your choice of wood stain or a protective matte clear coat to guard against bathroom moisture.
    3. Locate your wall studs using a stud finder and hold the iron brackets against the wall at your desired height.
    4. Mark the screw holes with a pencil, pre-drill pilot holes, and secure the brackets firmly to the wall using heavy-duty screws.
    5. Place the wooden shelf across the brackets and secure it from underneath with short wood screws.

Tips and Variations

  • Edge Styling: Leave one natural live edge facing outward for an organic, forest-inspired aesthetic.
  • Variation: Use polished brass or brushed gold brackets instead of black iron for an elevated, transitional glam touch.

3. Glass and Brushed Brass Glass-Box Shelves

Introduction

For those who love a touch of boutique hotel luxury, glass-box shelves with brushed brass frames offer unmatched sophistication, reflecting light and making compact bathrooms feel instantly larger.

What This Idea Means

Glass shelving represents transparency, lightness, and modern glamour. By framing glass panels in warm metallic finishes, these shelves create a floating display case effect that elevates everyday toiletries into curated decor pieces.

How to Make It

  • Materials Needed: Tempered glass sheets, pre-fabricated brass corner brackets, brass retaining bars, heavy-duty wall anchors, silicone adhesive, and a glass-leveling tool.
  • Step-by-Step Instructions:
    1. Measure and acquire custom-cut tempered glass panels (safety is paramount in wet areas).
    2. Mount the brass corner brackets securely to the wall, ensuring they are perfectly level.
    3. Apply a thin bead of clear silicone adhesive inside the bracket channels to cushion the glass and prevent slipping.
    4. Slide the glass panels carefully into the brackets and tighten any retention screws.
    5. Attach the front protective brass gallery rail if your bracket set includes one.

Tips and Variations

  • Lighting: Install a subtle, warm LED strip light directly above or beneath the glass shelf to create a glowing display effect.
  • Variation: Choose smoked grey or fluted textured glass for added privacy and a moody, high-end vintage vibe.

4. Arch-Niche Built-In Wall Shelves

Introduction

Bring architectural romance into your bathroom with recessed arched wall niches. Carved directly into the drywall, these built-in shelves maximize vertical space while adding graceful curved lines.

What This Idea Means

Arches soften the rigid, boxy geometry typical of modern bathrooms. A built-in arch niche acts as a focal point, drawing the eye upward and creating a serene, sanctuary-like atmosphere reminiscent of Mediterranean villas.

How to Make It

  • Materials Needed: Drywall saw, 2×4 lumber for framing, flexible drywall or thin plywood for the arch curve, joint compound, waterproof tile or waterproof paint, and silicone caulk.
  • Step-by-Step Instructions:
    1. Locate wall studs and carefully cut an opening in your drywall to your desired arch dimensions.
    2. Build a wooden box frame inside the wall cavity, securing it to the surrounding studs.
    3. Cut a piece of flexible plywood or scoring drywall to create the curved upper arch, nailing it into your top framing piece.
    4. Line the interior niche with cement backer board if you plan to tile, and apply a waterproof liquid membrane across all seams.
    5. Tile the interior with mosaic tiles or paint it with high-durability, moisture-resistant bathroom paint. Seal all perimeter edges with mildew-resistant silicone.

Tips and Variations

  • Backdrop Contrast: Use contrasting zellige or handmade Moroccan tiles inside the arch for a stunning pop of color and texture.
  • Variation: Insert a glass shelf midway up the tall arch niche to double your storage capacity without blocking visual depth.

5. Rattan and Cane Webbing Floating Shelves

Introduction

Infuse bohemian warmth and organic texture into your bathroom with rattan and cane webbing shelves. This design introduces natural plant fibers that thrive visually in spa-inspired environments.

What This Idea Means

Cane webbing celebrates traditional craftsmanship and relaxed coastal living. It softens hard tile surfaces and adds breathability, making the bathroom feel light, airy, and deeply connected to nature.

How to Make It

  • Materials Needed: Wooden picture ledges or shadow box frames, natural cane webbing (soaked in water for 30 minutes), heavy-duty staple gun, wood glue, and mounting hardware.
  • Step-by-Step Instructions:
    1. Cut your cane webbing to match the back panel or side inserts of your wooden shadow box shelves.
    2. Soak the cane webbing in warm water for 30 minutes to make it pliable and prevent cracking.
    3. Position the damp cane webbing tightly across the back panel of the shelf frame and secure it using a heavy-duty staple gun along the hidden edges.
    4. Allow the cane to dry completely; it will shrink slightly as it dries, creating a drum-tight, flawless surface.
    5. Mount the finished cane-backed shelves securely to your bathroom wall using wall anchors and screws.

Tips and Variations

  • Frame Finish: Paint the wooden frame in a soft sage green or warm cream to complement the natural golden tones of the rattan.
  • Variation: Use cane webbing as a decorative front skirt hanging below a simple wooden shelf.

6. Industrial Plumbing Pipe Corner Shelves

Introduction

Maximize awkward corner spaces with rugged style by crafting corner shelves supported by galvanized or matte black plumbing pipes and wooden rounds.

What This Idea Means

Corner spaces in bathrooms are frequently wasted. Industrial pipe shelving transforms neglected corners into striking vertical showcases, celebrating utilitarian design with a bold, masculine, yet versatile edge.

How to Make It

  • Materials Needed: Pre-cut wooden corner wedges (pine or oak), black iron floor flanges, threaded nipples, elbow joints, wood screws, and heavy wall anchors.
  • Step-by-Step Instructions:
    1. Sand and stain your triangular wooden corner shelves to your preferred shade.
    2. Assemble the pipe support brackets by screwing the floor flanges into the threaded pipe nipples and elbow joints, creating a sturdy L-bracket shape designed to support a corner hypotenuse or two adjacent walls.
    3. Hold the assembled pipe brackets against the corner walls, mark your anchor holes, and drill pilot holes.
    4. Secure the floor flanges tightly into the wall anchors.
    5. Rest the wooden corner shelves onto the pipe supports and secure them from underneath using short screws through pre-drilled holes in the pipe flanges if applicable, or heavy-duty mounting adhesive.

Tips and Variations

  • Metal Finish: Spray paint standard galvanized pipes with a hammered bronze or antique brass finish for an upscale industrial aesthetic.
  • Variation: Build a multi-tier floor-to-ceiling tension pole pipe shelving unit that requires zero drilling into tile.

7. Fluted Wood Statement Ledge Shelves

Introduction

Introduce sophisticated tactile rhythm with fluted wood ledge shelves. The repeating vertical grooves catch light and shadows, adding subtle luxury to contemporary bathrooms.

What This Idea Means

Fluting represents modern refinement and attention to architectural detail. It elevates a simple flat shelf into a high-end design feature, offering visual texture without overwhelming small spaces.

How to Make It

  • Materials Needed: Plain wooden floating ledge shelf, half-round wood molding strips, wood glue, miter saw, pin nailer, and paint or stain.
  • Step-by-Step Instructions:
    1. Measure the front face and exposed sides of your floating shelf.
    2. Cut your half-round molding strips to match these exact lengths using a miter saw for clean 45-degree corner angles.
    3. Apply a generous amount of wood glue to the back of each molding strip and press them side-by-side along the front face of the shelf.
    4. Secure the strips temporarily with a pin nailer while the glue dries.
    5. Fill any tiny nail holes with wood filler, sand smooth, and finish with a monochromatic coat of satin paint or matching wood stain. Mount securely to the wall.

Tips and Variations

  • Color Drenching: Paint both the wall and the fluted shelf the exact same warm terracotta or creamy beige hue for a seamless, designer-grade monochrome look.
  • Variation: Use fluted panels only on the underside support corbels for an unexpected architectural surprise.

8. Live-Edge Organic Wood Slab Shelves

Introduction

Celebrate the raw beauty of nature with a single live-edge wood slab shelf. Featuring the organic, untrimmed bark contour of the tree, this shelf brings wild elegance indoors.

What This Idea Means

Live-edge design honors the natural imperfections of wood—knots, sapwood variations, and winding edges. It anchors a bathroom with a powerful organic presence, contrasting beautifully against sleek modern tiles and glass shower doors.

How to Make It

  • Materials Needed: Live-edge hardwood slab (walnut, maple, or cedar), heavy-duty concealed blind shelf supports, orbital sander, clear epoxy or polyurethane finish, and a drill.
  • Step-by-Step Instructions:
    1. Clean the live-edge slab thoroughly, wire-brushing any loose bark if desired, or sand it smooth while retaining the natural undulating edge profile.
    2. Sand the top and bottom surfaces through progressive grits (80, 120, 220) until silky smooth.
    3. Drill deep, precise blind-hole channels into the back edge of the thick wood slab to fit your concealed heavy-duty metal rod supports.
    4. Apply multiple coats of a waterproof matte polyurethane or hardwax oil to protect the wood from high bathroom humidity.
    5. Mount the steel support rods firmly into wall studs, then slide the heavy live-edge slab onto the rods until flush against the wall.

Tips and Variations

  • Epoxy River Infill: Fill any natural cracks or butterfly joints in the wood slab with crystal-clear or midnight-tinted epoxy resin for a stunning art-piece finish.
  • Variation: Pair a thick live-edge walnut shelf with matte black leather strap hangers instead of metal brackets.

9. Scandi-Minimalist Leather Strap Shelves

Introduction

Light, airy, and effortlessly stylish, Scandi-minimalist leather strap shelves combine natural leather loops with light oak boards for a chic Nordic aesthetic.

What This Idea Means

This design champions functional minimalism with a cozy, tactile twist. The leather straps introduce buttery warmth and flexible movement, creating a relaxed yet curated bathroom storage solution.

How to Make It

  • Materials Needed: Two long strips of heavy-duty full-grain leather (about 2 inches wide), smooth light oak board, brass Chicago screws or rivets, wall anchors, and large brass wall screws.
  • Step-by-Step Instructions:
    1. Cut your leather strips to equal lengths (roughly 24 to 30 inches each depending on shelf depth).
    2. Fold each leather strip in half to form a loop, and secure the ends together with a brass Chicago screw or heavy-duty rivet, leaving enough loop space to slide your wooden board through.
    3. Hold the looped leather straps against the wall at your desired spacing, and drive large brass screws with decorative washers through the top folded loop directly into wall anchors or studs.
    4. Slide your smooth oak board horizontally through both hanging leather loops, adjusting until level and secure.

Tips and Variations

  • Leather Aging: Use vegetable-tanned natural leather that will darken and develop a gorgeous honey-brown patina over time with exposure to bathroom steam and sunlight.
  • Variation: Use dark bridle leather straps with copper hardware for a moodier, masculine contrast against white subway tiles.

10. Floating Drawer Box Shelves

Introduction

Combine open display with hidden clutter control using floating drawer box shelves. Perfect for storing cotton swabs, hair ties, and daily essentials out of sight while keeping the top surface pristine.

What This Idea Means

Clutter is the enemy of a tranquil bathroom. Floating drawer shelves offer a dual-purpose solution: an immaculate surface for a diffuser or candle, and a hidden compartment to tuck away unappealing necessities.

How to Make It

  • Materials Needed: Small wooden shadow box with a fitted drawer insert, heavy-duty French cleat mounting system, wood glue, finishing nails, and stain or paint.
  • Step-by-Step Instructions:
    1. Construct or purchase a shallow wooden box frame and matching sliding drawer insert.
    2. Attach one half of a French cleat mounting bracket securely to the back panel of the drawer box using wood screws and wood glue.
    3. Finish the exterior wood with your preferred stain or moisture-resistant paint.
    4. Mount the corresponding half of the French cleat level onto your bathroom wall, ensuring it hits at least one wall stud.
    5. Hang the drawer box shelf onto the wall cleat, ensuring the drawer slides smoothly in and out without obstruction.

Tips and Variations

  • Push-to-Open Hardware: Install magnetic push-to-open drawer glides so the exterior remains completely sleek without the need for protruding knobs or pulls.
  • Variation: Stack two drawer shelves vertically to create a bedside-style nightstand storage tower right beside your bathroom vanity.

11. Built-in Vertical Recessed Tower Shelves

Introduction

Optimize narrow wall cavities with a tall, multi-tier vertical recessed tower shelf. Carved into standard wall stud bays, this floor-to-ceiling solution offers massive storage with zero footprint.

What This Idea Means

Vertical recessed towers maximize overlooked vertical real estate. They represent clever space planning, transforming empty drywall between studs into a high-capacity display and storage library for towels and jars.

How to Make It

  • Materials Needed: Drywall saw, 2×4 framing lumber, cement backer board, multiple pre-cut glass or wood interior shelves, tile or waterproof paint, and trim molding.
  • Step-by-Step Instructions:
    1. Locate vertical studs and map out a tall, narrow rectangle (e.g., 14 inches wide by 60 inches high) between two studs.
    2. Cut away the drywall and install horizontal fire-block framing pieces inside the wall cavity at your desired shelf height intervals.
    3. Line the interior frame with cement backer board, sealing all corners with waterproof membrane tape.
    4. Install your permanent interior shelf supports and insert glass or wooden shelves at each interval.
    5. Apply decorative trim molding around the outer perimeter of the wall cutout for a clean, built-in cabinet finish.

Tips and Variations

  • Accent Lighting: Run a vertical mini LED light strip down the back interior corner of the tower to illuminate your toiletries like a high-end display cabinet.
  • Variation: Add a lower cabinet door with louvered slats to hide bulky toilet paper storage while keeping upper shelves open for decor.

12. Vintage Ornate Gold-Framed Shadow Shelves

Introduction

Inject old-world Parisian apartment romance into your bathroom with vintage, ornate gold-gilded frame shadow shelves.

What This Idea Means

Mixing antique elements into a modern bathroom creates an eclectic, highly curated look that feels collected over time rather than showroom-bought. Ornate gold frames turn ordinary storage into framed works of art.

How to Make It

  • Materials Needed: Upcycled vintage wooden picture frame with deep ornate molding, matching wooden board for the shelf base, wood glue, gold leafing paint, and heavy-duty picture hanging hardware.
  • Step-by-Step Instructions:
    1. Clean and restore your vintage thrifted picture frame, applying antique gold leaf paint to highlight the intricate scrollwork details.
    2. Cut a wooden shelf board to fit snugly inside the inner rebate of the picture frame.
    3. Secure the wooden shelf board to the frame backing using strong wood glue and pocket screws driven from the back.
    4. Attach heavy-duty D-ring hangers securely to the back frame structure.
    5. Hang the ornate shadow shelf securely on heavy wall anchors, styling the interior with vintage perfume bottles and rolled guest towels.

Tips and Variations

  • Mirror Backing: Replace the wooden back panel with an antique distressed mirror insert to multiply light and depth.
  • Variation: Paint the frame in a matte pastel sage or chalk white for a softer French country cottage aesthetic.

13. Double-Tier Industrial Scaffold Board Shelves

Introduction

For bathrooms that require serious storage without sacrificing style, double-tier industrial scaffold board shelves deliver rugged durability and abundant surface area.

What This Idea Means

Scaffold boards bring rugged, weathered character with their heavy-duty thickness and natural saw marks. A double-tier configuration provides hierarchical storage—top shelf for decorative greenery, bottom shelf for everyday necessities.

How to Make It

  • Materials Needed: Two thick scaffold wooden boards cut to length, four heavy iron pipe wall brackets (configured for a two-tier span), sanding block, wood sealer, and heavy wall anchors.
  • Step-by-Step Instructions:
    1. Sand the scaffold boards thoroughly to eliminate splinters while retaining their authentic industrial patina and stamps.
    2. Apply a protective satin polyurethane or waterproof wood wax.
    3. Assemble your vertical iron pipe brackets, ensuring the upper and lower shelf supports align perfectly.
    4. Mount the top and bottom brackets securely to wall studs, checking alignment with a spirit level at every step.
    5. Place both scaffold boards onto their respective bracket tiers and secure them underneath with heavy screws.

Tips and Variations

  • Bracket Styling: Wrap leather or hemp rope around sections of the iron pipes to soften the industrial aesthetic.
  • Variation: Hang a matching towel bar suspended directly beneath the bottom scaffold shelf.

14. Acrylic Invisible Floating Wall Ledges

Introduction

Achieve the ultimate modern illusion with crystal-clear acrylic invisible floating wall ledges, allowing your luxury bath products and colorful bottles to appear as if they are floating mid-air.

What This Idea Means

Acrylic shelving represents minimalism at its absolute peak. By eliminating visual clutter from the shelf material itself, the focus remains entirely on the curated items displayed, making small powder rooms feel expansive and uncluttered.

How to Make It

  • Materials Needed: Clear cast acrylic wall ledges with pre-drilled mounting holes, stainless steel wall standoffs or mounting screws with rubber washers, and a drill.
  • Step-by-Step Instructions:
    1. Hold the clear acrylic ledge against your bathroom tile or drywall at the desired height.
    2. Use a pencil to mark the pre-drilled screw holes through the acrylic onto the wall.
    3. Drill appropriate anchor holes into the wall and insert heavy-duty wall anchors.
    4. Mount the acrylic ledge using stainless steel screws equipped with protective rubber washers to prevent cracking the acrylic under pressure.
    5. Snap decorative screw caps over the heads for a flawless, polished finish.

Tips and Variations

  • Backlit Glow: Mount the clear acrylic shelf in front of a frosted glass privacy window or backlit mirror to let natural light pass right through the shelf and bottles.
  • Variation: Use neon-tinted pink or teal translucent acrylic shelves for a playful retro-futuristic pop art aesthetic.

15. Geometric Honeycomb Hexagon Wall Shelves

Introduction

Add playful geometric rhythm to your bathroom walls with interconnected honeycomb hexagon shelves, perfect for styling small decorative accents, succulents, and crystal stones.

What This Idea Means

Hexagons introduce organic cellular symmetry inspired by nature. They break up the monotony of rectangular bathroom tiles and linear mirrors, offering dynamic compartmentalized styling opportunities.

How to Make It

  • Materials Needed: Pre-made wooden hexagon shadow box frames (or cut your own using a miter saw at 30-degree angles), wood glue, clamping strap, wood stain, and small sawtooth hangers.
  • Step-by-Step Instructions:
    1. If building from scratch, cut six identical pieces of wood with 30-degree mitered ends.
    2. Apply wood glue to all miter joints and assemble the hexagon shape, securing it tightly with a band clamp until dry.
    3. Sand the exterior and interior surfaces smooth, then apply your preferred wood stain or matte paint.
    4. Attach heavy-duty sawtooth hangers or small concealed keyhole brackets to the back frame.
    5. Arrange a cluster of interlocking hexagons on your bathroom wall, securing them firmly with wall anchors.

Tips and Variations

  • Ombre Paint Effect: Paint each interconnected hexagon in a slightly different shade of the same color palette (e.g., gradient blues from navy to sky blue).
  • Variation: Insert a smaller hexagon shelf floating inside a larger outer hexagon frame for layered depth.

16. Teak Slat Spa-Style Wall Caddies

Introduction

Bring authentic Japanese Onsen luxury into your shower or bathroom with water-resistant teak slat wall caddies, designed to handle humidity with natural elegance.

What This Idea Means

Teak is naturally rich in natural oils, making it impervious to moisture, rot, and mildew. Slat designs allow water to drain instantly, representing purity, relaxation, and functional spa living.

How to Make It

  • Materials Needed: Sustainably harvested plantation teak slats, marine-grade stainless steel screws, waterproof wood glue, teak oil, and tile-safe suction cup mounts or drill brackets.
  • Step-by-Step Instructions:
    1. Cut your teak slats to desired lengths and sand all edges smooth.
    2. Assemble the slatted shelf box using waterproof exterior wood glue and marine-grade stainless steel screws that will never rust.
    3. Apply multiple generous coats of pure teak oil to nourish the wood and enhance its golden-brown grain.
    4. Mount the teak caddy securely to your bathroom wall or shower tile using heavy-duty drill anchors (or high-strength waterproof silicone adhesive if drilling into tile is not possible).

Tips and Variations

  • Slat Spacing: Keep gaps between slats wide enough to hold upright shampoo bottles securely without tipping over.
  • Variation: Include built-in wooden notches underneath the shelf specifically designed for hanging loofahs and washcloths.

17. Pebbled Stone-Mosaic Backed Display Ledges

Introduction

Connect your bathroom decor to earth elements with a slim display ledge featuring a natural pebbled stone-mosaic tile backdrop.

What This Idea Means

This style brings the tranquility of a riverbed or coastal shore into your daily routine. The tactile contrast between smooth river stones and a sleek wooden or metal shelf creates a rich, multisensory aesthetic.

How to Make It

  • Materials Needed: Slim wooden floating shelf, sheet of pebble mosaic tile, mastic tile adhesive, grout, tile cutter, and mounting brackets.
  • Step-by-Step Instructions:
    1. Measure the wall space directly above and below where your shelf will hang.
    2. Apply tile mastic adhesive to the wall and press a sheet of pebble mosaic tile into place as a feature backdrop.
    3. Allow the adhesive to cure for 24 hours, then apply matching grout between the pebbles, wiping clean with a damp sponge.
    4. Mount your slim floating shelf directly over the tiled backdrop, ensuring the bracket anchors secure firmly through the tile mortar.

Tips and Variations

  • Stone Sealing: Seal the river stones with a wet-look stone enhancer to make the natural colors pop vibrantly.
  • Variation: Use sliced flat river stones instead of rounded pebbles for a smoother, modern Zen spa appearance.

18. Minimalist Metal Wire Basket Floating Shelves

Introduction

Combine the open breathability of wire mesh with the utility of a shallow shelf. Minimalist metal wire basket shelves keep toiletries contained while maintaining an airy, modern silhouette.

What This Idea Means

Wire baskets offer security against tumbling bottles while preserving visual lightness. This look suits urban lofts, Scandinavian apartments, and contemporary family bathrooms alike.

How to Make It

  • Materials Needed: Matte black or brushed nickel wire storage baskets, wooden board insert (optional for the basket base), wall anchors, and mounting screws.
  • Step-by-Step Instructions:
    1. Select a shallow wire basket designed for wall mounting.
    2. If the wire bottom has wide gaps that cause small bottles to wobble, cut a thin piece of plywood or acrylic to fit snugly inside the base of the basket.
    3. Hold the wire basket against your bathroom wall at eye level and mark the mounting hole positions through the wire grid.
    4. Drill pilot holes and insert heavy-duty wall anchors.
    5. Secure the wire basket firmly to the wall using matching screws through the integrated mounting loops.

Tips and Variations

  • Dual Function: Hang the wire basket upside down and use the flat top surface as a traditional shelf while utilizing the hanging basket grid underneath for rolled washcloths.
  • Variation: Use copper-plated wire baskets for a warm, luxurious metallic accent against dark charcoal walls.

19. Moroccan Zellige-Tiled Open Wall Ledges

Introduction

Embrace rich Mediterranean craftsmanship with a shallow open wall ledge framed entirely in handmade Moroccan Zellige ceramic tiles.

What This Idea Means

Zellige tiles are famous for their unique surface variations, pearlescent sheens, and organic imperfections. A tiled shelf creates a monolithic, architectural feature that feels like a custom work of art.

How to Make It

  • Materials Needed: Plywood shelf core, cement backer board, Moroccan Zellige tiles, tile adhesive, unsanded grout, and heavy-duty hidden L-brackets.
  • Step-by-Step Instructions:
    1. Construct a sturdy wooden shelf core and wrap it in cement backer board.
    2. Mount the heavy-duty hidden L-brackets securely to your wall studs, then slide your tiled shelf core framework over them.
    3. Apply tile adhesive to the exterior surfaces of the shelf and carefully lay your Moroccan Zellige tiles, abutting them tightly with virtually zero grout lines.
    4. Apply a light wash of matching grout to fill any microscopic gaps, and wipe clean immediately.

Tips and Variations

  • Color Palette: Choose shimmering emerald green, deep ocean blue, or soft alabaster white Zellige tiles to complement your bathroom color scheme.
  • Variation: Add a matching 2-inch tiled lip at the front edge of the shelf to act as a built-in safety barrier for glass bottles.

20. Reclaimed Ladder Rung Wall Shelves

Introduction

Repurpose vintage wooden ladder rungs into a charming multi-tier wall-mounted shelving system that exudes rustic cottagecore and antique character.

What This Idea Means

Ladder shelves celebrate sustainable upcycling and vertical storytelling. By mounting old ladder sections horizontally or vertically on the wall, you create unexpected character and practical tiered display ledges.

How to Make It

  • Materials Needed: Vintage wooden ladder side rail or detached rungs, heavy metal standoff brackets, sandpaper, clear wood sealer, and wall anchors.
  • Step-by-Step Instructions:
    1. Source a vintage wooden ladder, clean it thoroughly, and sand away rough patches while keeping the charming weathered paint or stain intact.
    2. Cut the ladder section to your preferred wall length (e.g., a 3-rung section).
    3. Attach custom metal standoff brackets or heavy-duty mounting loops to the back rails of the ladder segment.
    4. Hold the ladder shelf system level against your bathroom wall, mark the anchor points, and drill pilot holes.
    5. Securely mount the ladder structure to the wall, utilizing the rungs and flat rails as multi-level ledges for plants, jars, and rolled towels.

Tips and Variations

  • Hanging Hooks: Screw small brass cup hooks into the underside of the wooden ladder rungs to hang bath sponges and hand towels.
  • Variation: Paint the weathered ladder in a crisp matte white to soften the rustic look for a clean beach-house aesthetic.