Spread the love

Outdoor living spaces have evolved into sophisticated extensions of the home. Treating your garden perimeter, patio boundaries, brick masonry, or courtyard enclosures with the same artistic care as interior accent walls elevates an ordinary backyard into a serene sanctuary. By incorporating vertical living greenery, warm architectural metals, vintage stonework, and soft flickering illumination, you can create a captivating backdrop that enhances your landscape design year-round.

This comprehensive guide explores 20 unique, realistic, and Pinterest-worthy garden wall decor ideas. Each concept includes a breakdown of its design aesthetic, step-by-step guidance on how to create or install it, practical tips and variations, and a complete checklist of required materials.

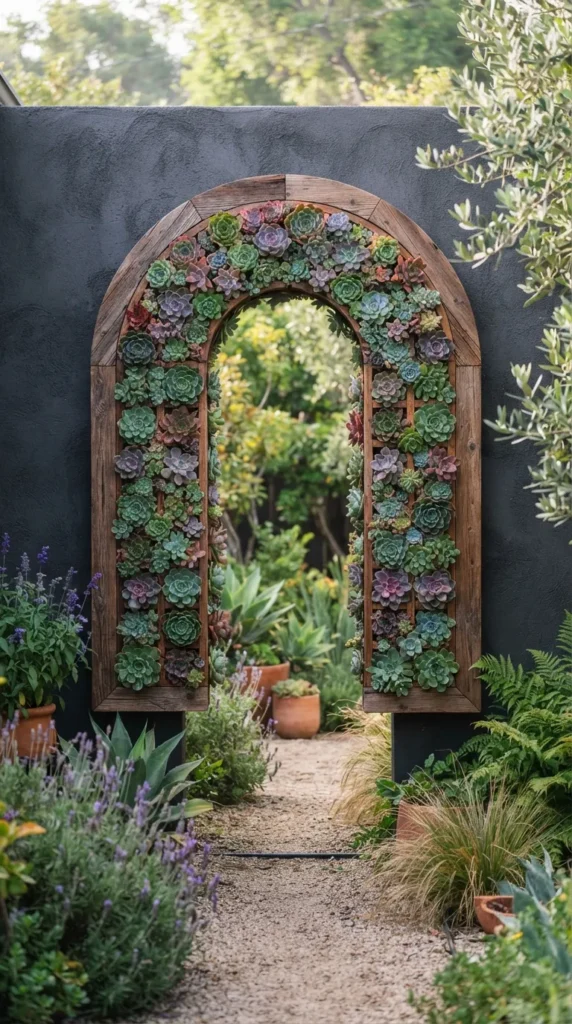
1. The Living Archway Vertical Succulent Grid

Introduction

A geometric fusion of modern architectural framing and drought-tolerant botanical textures, this vertical succulent grid transforms bare masonry or timber fences into living art.
What This Idea Means

This concept treats vertical garden design like a living tapestry. By arranging varied rosettes of echeveria, sedum, and trailing string-of-pearls within a structured grid, you create a low-maintenance, drought-tolerant focal point that adds rich tactile contrast to stone or plastered outdoor walls.

How to Make It

  1. Frame Construction: Build a shallow rectangular wooden shadowbox frame (3 to 4 inches deep) using rot-resistant cedar or teak lumber.
  2. Backing and Mesh: Staple a solid exterior plywood backplate lined with a waterproof membrane, then attach heavy-duty galvanized wire mesh across the front opening.
  3. Soil Preparation: Pack the frame tightly with a lightweight, fast-draining cactus and succulent soil mix through the wire mesh grid.
  4. Planting: Insert rooted cuttings of various succulent species into the wire mesh grid spaces, pressing soil firmly around each root ball.
  5. Rooting Phase: Keep the frame lying flat horizontally in indirect sunlight for 4 to 6 weeks to allow roots to establish firmly in the mesh before mounting vertically.
  6. Mounting: Secure the framed grid onto your garden wall using heavy-duty masonry anchors or z-clip hanging brackets.

Tips and Variations

  • Tip: Water sparingly using a drip hose or misting wand to prevent soil washout from the wire pockets.
  • Variation: Construct the outer frame in an arch silhouette rather than a rectangle to mirror classical garden gates.

What You Need to Make It

  • Rot-Resistant Cedar Lumber & Waterproof Liner
  • Galvanized Wire Mesh (1/2-inch grid)
  • Fast-Draining Succulent Soil Mix
  • Assorted Succulent Cuttings (Echeveria, Sedum, Sempervivum)
  • Heavy-Duty Z-Clip Wall Hangers

2. Antique French Fleur-de-Lis Iron Trellis with Climbing Roses

Introduction

A nod to classic European courtyard design, this ornamental wrought-iron trellis supports sweet-scented climbing roses, framing garden walls with vintage elegance and vertical blooms.

What This Idea Means

This idea celebrates classical symmetry and romantic garden architecture. The dark silhouette of hand-forged iron scrollwork provides structural interest even during winter months, while blooming roses blanket the wall in vibrant color and fragrance during spring and summer.

How to Make It

  1. Wall Prep: Inspect your exterior brick or rendered wall and clear away loose debris.
  2. Mounting Standoffs: Install 2-inch stainless steel spacer brackets into the wall using a masonry drill bit and anchors. Mounting the trellis slightly away from the wall ensures healthy airflow behind plant foliage.
  3. Trellis Installation: Secure an antique or reproduction wrought-iron Fleur-de-lis trellis frame onto the wall brackets.
  4. Planting: Plant a fragrant climbing rose variety (such as ‘Eden’ or ‘David Austin’) at the base of the wall directly beneath the trellis.
  5. Training Vines: Loosely tie the primary cane shoots onto the iron scrollwork using soft jute twine or green garden tape in a fan pattern to encourage lateral blooming.

Tips and Variations

  • Tip: Prune dead wood annually in late winter and tie new canes horizontally across the trellis to maximize flower bud production along the stems.
  • Variation: Substitute climbing roses with evergreen Star Jasmine for year-round dark green foliage and starry summer flowers.

What You Need to Make It

  • Antique-Style Wrought-Iron Fleur-de-Lis Trellis
  • 2-inch Metal Wall Spacer Brackets & Masonry Anchors
  • Bare-Root or Potted Climbing Rose Plant
  • Soft Jute Garden Twine
  • Pruning Shears & Gardening Gloves

3. Backlit Weathered Corten Steel Botanical Panel

Introduction

Blending industrial warmth with modern laser-cut art, a Corten steel panel with botanical cutouts offers dramatic texture by day and warm ambient glow by night when backlit with warm LEDs.

What This Idea Means

Corten steel develops a protective, warm rust-orange patina over time when exposed to the elements. Combined with delicate laser-cut leaf or fern patterns and concealed backlighting, this art panel turns dark garden walls into glowing evening features.

How to Make It

  1. Panel Selection: Acquire a laser-cut Corten steel panel featuring geometric or botanical leaf cutouts with folded 2-inch side mounting flanges.
  2. Electrical Setup: Route an outdoor low-voltage landscape lighting cable along the garden wall behind the designated panel location.
  3. Lighting Mount: Attach waterproof warm-white (2700K) LED light strips or diffuse puck lights to the wall directly behind where the panel center will sit.
  4. Weathering Process: Spray the raw steel panel with a mixture of water, salt, and hydrogen peroxide to accelerate the formation of an even, rich orange rust patina before installation.
  5. Wall Mount: Fasten the panel flanges to the garden wall using stainless steel screws and rubber washers, leaving the hollow back cavity open for lighting diffusion.

Tips and Variations

  • Tip: Seal the matured rust patina with a clear exterior matte sealer if you want to prevent rust runoff from staining lighter concrete paths below.
  • Variation: Pair Corten steel panels with a dark charcoal slate wall background for striking color contrast.

What You Need to Make It

  • Laser-Cut Corten Steel Art Panel
  • Low-Voltage Waterproof LED Strip/Puck Lights
  • Outdoor Landscape Transformer & Wiring
  • Salt, Hydrogen Peroxide, and Spray Bottle (for patina)
  • Stainless Steel Fasteners & Masonry Anchors

4. Vintage Weathered Cathedral Window Mirror

Introduction

Designed to mimic classical Gothic cathedral architecture, a distressed arched wooden window mirror creates the illusion of a hidden secret garden beyond your boundary wall.

What This Idea Means

Mirrors are powerful design tools in outdoor spaces. By reflecting green foliage and ambient sunlight, an arched cathedral mirror visually doubles the perceived depth of narrow courtyards while adding vintage architectural charm.

How to Make It

  1. Mirror Prep: Acquire an arch-topped wooden cathedral window frame fitted with an exterior-grade safety glass mirror backing.
  2. Weatherproofing: Coat the rear backing and wooden frame joints with clear exterior waterproof silicone and marine spar varnish to protect against moisture warping.
  3. Distressing Finish: Apply a layered chalk paint finish (sage green or off-white over dark timber), then lightly sand the edges to reveal a weathered, antique patina.
  4. Secure Mounting: Drill heavy-duty masonry anchors into your stone or brick wall, fitting them with stainless steel lag hooks.
  5. Hanging & Styling: Mount the mirror at eye level, framing the sides with climbing ivy or potted topiary trees to soften the outer edges.

Tips and Variations

  • Tip: Position the mirror at a slight angle away from direct sun path to avoid concentrated heat reflection onto nearby delicate plant leaves.
  • Variation: Replace clear mirror glass with mercury-antiqued glass for a softer, vintage reflection.

What You Need to Make It

  • Arched Wooden Cathedral Window Frame Mirror
  • Exterior Marine Spar Varnish & Clear Silicone Sealant
  • Chalk Paint & Sandpaper (for distressing)
  • Heavy-Duty Masonry Anchors & Lag Hooks
  • Trailing Ivy or Surrounding Potted Plants

5. Reclaimed Terracotta Wall-Pocket Herb Garden

Introduction

A functional and charming Italian-inspired installation that utilizes rustic terracotta wall-pocket planters to display aromatic culinary herbs on sunny garden walls.

What This Idea Means

This concept merges Tuscan country aesthetics with practical urban gardening. Mounting half-round terracotta pockets directly onto rendered or brick walls creates an accessible, fragrant vertical herb garden steps from your outdoor kitchen or dining table.

How to Make It

  1. Pocket Planters: Source 5 to 7 half-round terracotta wall-pocket planters featuring pre-drilled rear hanging holes and bottom drainage ports.
  2. Wall Layout: Mark a symmetrical grid or a staggered diamond pattern across your brick or plaster wall using a chalk line and level.
  3. Drilling & Mounting: Drill mounting holes using a masonry bit, insert plastic expansion plugs, and drive stainless steel pan-head screws, leaving 1/4 inch exposed.
  4. Soil & Planting: Line the interior base of each terracotta pocket with a piece of mesh tape, pack with nutrient-rich potting soil, and plant culinary herbs (thyme, rosemary, oregano, mint, and basil).
  5. Hanging: Mount the filled terracotta pockets onto the exposed screw heads, ensuring they hang flush against the wall.

Tips and Variations

  • Tip: Soak terracotta pockets in water for 15 minutes before planting to prevent dry clay from leeching moisture away from fresh soil.
  • Variation: Glaze the terracotta pockets in mismatched pastel tones (olive green, ochre, terracotta, dusty blue) for a Mediterranean aesthetic.

What You Need to Make It

  • Half-Round Terracotta Wall-Pocket Planters
  • Masonry Drill Bit, Plugs & Stainless Screws
  • Quality Outdoor Potting Soil & Drainage Mesh
  • Assorted Culinary Herb Plants
  • Chalk Line & Level

6. Tiered Teak & Rope Hanging Shelf Display

Introduction

Bringing indoor floating shelf styling outdoors, this tiered teak wood and nautical rope hanging display holds potted ferns, candles, and stone sculptures against garden fences.

What This Idea Means

This idea adds warmth, horizontal lines, and organic texture to flat timber fences or masonry walls. Tiered wooden planks suspended by thick natural rope create flexible display levels for seasonal garden accents.

How to Make It

  1. Shelf Preparation: Cut three 30-inch lengths of 1×6-inch Grade-A teak or ipe wood boards. Drill a 3/4-inch hole through all four corners of each board.
  2. Sealing Timber: Apply two coats of teak oil to seal the wood against rain, UV rays, and mildew.
  3. Rope Threading: Thread two 12-foot lengths of 1/2-inch thick natural Manila or polypropylene nautical rope through the corner holes of the shelves.
  4. Knotting Levels: Tie sturdy overhand knots under each shelf corner to keep the planks perfectly level, spacing the tiers 12 inches apart.
  5. Wall Mount: Install two heavy-duty iron wall brackets at the top of your fence or wall, hanging the upper rope loops from decorative S-hooks.

Tips and Variations

  • Tip: Use synthetic rot-resistant Manila-look rope if your garden wall is exposed to heavy seasonal rain.
  • Variation: Paint the wooden shelf planks in a crisp white or slate gray to contrast with dark dark brick walls.

What You Need to Make It

  • Teak or Ipe Lumber Boards
  • 1/2-inch Thick Nautical Manila Rope
  • Teak Oil & Application Cloth
  • Heavy-Duty Iron Wall Brackets & S-Hooks
  • Cordless Drill & 3/4-inch Wood Drill Bit

7. Carved Limestone Classical Wall Fountain

Introduction

A serene focal point that introduces the soothing sound of trickling water, a wall-mounted limestone fountain basin brings European estate luxury to courtyard walls.

What This Idea Means

Water features create sensory tranquility by masking city noise and attracting local birds. A classical carved stone wall fountain acts as a grand architectural centerpiece, adding weight, history, and soothing acoustics to garden seating areas.

How to Make It

  1. Location & Power: Choose a sturdy masonry wall near a GFCI outdoor electrical outlet and water supply line.
  2. Lower Basin Mount: Level and anchor a heavy cast-limestone or stone-composite water catchment basin to the wall base using stainless steel mounting brackets.
  3. Upper Spout Panel: Mount the upper decorative carving (featuring a lion head, acanthus leaf, or classical urn spout) vertically above the lower basin.
  4. Pump Assembly: Connect a submersible low-voltage fountain pump inside the lower basin, running the clear vinyl water tubing up behind the wall panel to the spout orifice.
  5. Testing: Fill the basin with clean water, plug in the pump, adjust water flow rate, and surround the base with potted trailing maidenhair ferns.

Tips and Variations

  • Tip: Add a water-treating algaecide tablet monthly to keep the recirculating water crystal clear and prevent green moss buildup over stone carvings.
  • Variation: Install subtle warm LED underwater spotlighting inside the basin to illuminate water ripples onto the wall face at night.

What You Need to Make It

  • Cast Limestone / Composite Wall Fountain Kit
  • Submersible Water Fountain Pump & Clear Tubing
  • Stainless Steel Wall Mounting Brackets & Anchor Bolts
  • GFCI Exterior Electrical Outlet Access
  • Potted Ferns & Moss Accents

8. Oversized Wrought Iron Roman Numeral Clock

Introduction

A dramatic blend of utility and vintage charm, a massive open-frame wrought-iron clock with Roman numerals makes an eye-catching statement on expansive exterior walls.

What This Idea Means

Large empty wall expanses demand bold scale. An oversized open-work metal clock provides graphic geometry and functional timekeeping without feeling heavy, allowing the underlying wall texture to show through the open numeral frame.

How to Make It

  1. Clock Selection: Source a 36-to-48-inch open-frame outdoor clock made of powder-coated, rust-resistant wrought iron with a sealed waterproof movement.
  2. Wall Prep: Determine the central eye-level mounting point on your garden boundary wall.
  3. Anchoring: Drill a deep hole using a masonry drill bit, insert a heavy-duty wall anchor, and drive a stainless steel lag screw, leaving 1/2 inch projecting outward.
  4. Mounting: Hang the clock frame securely onto the lag screw, checking vertical alignment with a torpedo level.
  5. Frame Accent: Flank the clock with symmetrical outdoor wall sconces or train low-profile climbing vines around the outer circular frame.

Tips and Variations

  • Tip: Ensure the clock movement compartment is rated IP65 waterproof for outdoor weather exposure.
  • Variation: Choose a clock frame finished in brushed antique bronze or distressed white verdigris rather than black.

What You Need to Make It

  • Outdoor-Rated Wrought Iron Open-Frame Clock
  • Masonry Drill Bit & Heavy-Duty Expansion Wall Anchors
  • Stainless Steel Lag Screw
  • Torpedo Level & Measuring Tape
  • Weatherproof AA Batteries

9. Modern Minimalist Slatted Wood Accent Panel

Introduction

Featuring crisp parallel lines of warm cedar or thermo-pine timber slats, this modern wall panel adds architectural texture, visual warmth, and linear elegance to contemporary patios.

What This Idea Means

Modern outdoor design favors clean geometry and natural wood tones. A vertical or horizontal slatted timber accent panel breaks up monochrome concrete or rendered brick, providing a warm backdrop for minimalist planters and wall sconces.

How to Make It

  1. Frame Battens: Fasten 2×2-inch pressure-treated black timber furring strips vertically to your wall spaced 24 inches apart using masonry anchors.
  2. Timber Slats: Cut 1×2-inch cedar or thermo-pine slats to your desired panel height (e.g., 6 feet tall).
  3. Slat Staining: Stain all four sides of the timber slats with a UV-resistant natural teak or walnut exterior oil stain and let dry.
  4. Installation: Fasten the slats horizontally across the black battens using stainless steel brad nails, using 1/2-inch wooden spacers to maintain uniform gaps.
  5. Accents: Mount sleek black cylinder up-and-down outdoor wall lights onto the finished slatted panel.

Tips and Variations

  • Tip: Painting the backing furring strips black creates deep shadow lines behind the warm timber slats, enhancing 3D depth.
  • Variation: Attach floating black metal planter boxes directly onto the slatted wood panel to hold cascading trailing ivy or silver dichondra.

What You Need to Make It

  • 1×2 Cedar / Thermo-Pine Slats & 2×2 Furring Strips
  • UV-Resistant Exterior Timber Oil Stain
  • Black Exterior Paint (for battens)
  • Stainless Steel Brad Nails & Brad Nailer
  • 1/2-inch Spacers & Level

10. Mosaic Cracked-Tile Botanical Wall Mural

Introduction

Artisanal and vibrant, a handcrafted mosaic mural built from colorful glazed ceramic tiles, mirror shards, and stained glass brings permanent color and Mediterranean energy to garden walls.

What This Idea Means

Mosaic art offers weatherproof, permanent color that never fades in sunlight. Creating custom botanical motifs—like olive branches, blooming bougainvillea, or geometric mandala wheels—turns plain outdoor masonry into a durable art gallery.

How to Make It

  1. Surface Prep: Clean and score a rendered concrete or brick wall surface to create a rough bonding texture.
  2. Design Outline: Sketch your botanical mural outline directly onto the wall using waterproof chalk or a grease pencil.
  3. Tile Preparation: Break glazed ceramic tiles, stained glass, and mirror pieces into varied geometric mosaic tesserae using tile nippers.
  4. Tile Application: Apply exterior thin-set mortar to small wall sections using a notched trowel, pressing tile pieces firmly into the mortar following your sketch lines.
  5. Grouting: Once mortar cures (24 hours), spread exterior waterproof tile grout across the entire mosaic using a rubber float, wiping tile faces clean with a damp sponge.

Tips and Variations

  • Tip: Mix small pieces of mirrored glass into the mosaic layout to capture and reflect flickering sunlight across your patio.
  • Variation: Create a mosaic border frame around a central wall fountain or garden doorway instead of a full mural.

What You Need to Make It

  • Glazed Ceramic Tiles, Stained Glass & Mirror Pieces
  • Tile Nippers & Safety Goggles
  • Exterior Thin-Set Mortar & Notched Trowel
  • Waterproof Exterior Tile Grout & Rubber Float
  • Sponge, Bucket & Waterproof Chalk

11. Antique Brass Brass Bell & Nautical Sconce Station

Introduction

Combining functional rustic charm with vintage marine history, a polished or patinaed brass ship’s bell paired with an antiqued brass cage sconce brings maritime warmth to patio walls.

What This Idea Means

This idea brings tactile interaction and vintage hardware into garden styling. A ringing brass bell adds playful charm during outdoor gatherings, while matching nautical cage lighting provides warm evening illumination.

How to Make It

  1. Bell Mounting: Secure a heavy cast-brass bell bracket to a sturdy wooden fence post or brick wall pillar using stainless steel lag screws.
  2. Lanyard: Attach a knotted cream cotton or jute macramé rope lanyard to the bell clapper.
  3. Lighting Installation: Hardwire or install a battery-operated vintage brass nautical bulkhead sconce fixture 12 inches above the bell.
  4. Surrounding Styling: Flank the station with hanging brass planter pots filled with trailing string-of-bananas or pearl succulents.
  5. Maintenance: Polish the brass with brass cleaner for a bright shine, or leave it untreated to develop a natural turquoise-green verdigris patina.

Tips and Variations

  • Tip: Use brass-coated stainless steel screws to prevent rust streaks running down lighter masonry walls below the bell mount.
  • Variation: Pair the bell with a vintage brass barometer or maritime weather station dial on the same wall.

What You Need to Make It

  • Cast Brass Ship’s Bell with Bracket & Knotted Lanyard
  • Antique Brass Nautical Bulkhead Wall Sconce
  • Stainless Lag Screws & Masonry Plugs
  • Hanging Brass Planter Pots & Trailing Plants
  • Brass Polish (optional)

12. Floating Copper Pipe Hanging Tillandsia Air Plant Display

Introduction

A minimalist industrial sculpture made from warm copper pipes and delicate air plants (Tillandsias) that float weightlessly against dark stone or wooden garden walls.

What This Idea Means

Air plants do not require soil to thrive, making them perfect for clean vertical displays. Arranging warm copper pipes into geometric geometric ladder or grid frames creates a modern, lightweight botanical art piece.

How to Make It

  1. Frame Assembly: Connect 1/2-inch copper pipes, elbow joints, and T-connectors into a multi-tiered geometric grid or ladder frame using copper adhesive or soldering.
  2. Mounting Brackets: Secure the copper frame onto your wall using copper pipe saddle straps and brass screws.
  3. Air Plant Mounting: Wrap fine copper wire loosely around the base of various Tillandsia air plants (such as Tillandsia xerographica and ionantha).
  4. Placement: Hook or twist the wire-mounted air plants along the copper pipe frame tiers.
  5. Care Routine: Mist the air plants with water two to three times a week using a fine mist spray bottle.

Tips and Variations

  • Tip: Never use treated or galvanized wire for air plants; pure copper wire is safe and complements the pipe aesthetic seamlessly.
  • Variation: Mount the copper frame against a dark charcoal-painted background wall to make the orange copper and green air plants pop visually.

What You Need to Make It

  • 1/2-inch Rigid Copper Pipe & Elbow/T-Connectors
  • Copper Pipe Saddle Straps & Screws
  • Fine Pure Copper Craft Wire
  • Assorted Healthy Tillandsia Air Plants
  • Fine Water Mist Spray Bottle

13. Distressed Teak Shutter Wall Planters

Introduction

Upcycling vintage louvered wooden window shutters into distressed wall planters brings French provincial or Mediterranean countryside character to plain garden walls.

What This Idea Means

Reclaiming architectural salvage adds instant narrative history and charm. The horizontal louvers of window shutters serve as natural slots for attaching hanging terracotta pots, flower boxes, or climbing vine clips.

How to Make It

  1. Salvage Preparation: Acquire a pair of solid wood louvered window shutters. Sand lightly to remove loose flaking paint.
  2. Weather Sealing: Coat shutters with a clear exterior matte sealer or distress-paint them in soft pastel tones (pastel blue, sage, or cream).
  3. Mounting Shutters: Mount the shutters side-by-side or flanking a central wall feature using heavy-duty wall anchors and stainless steel screws.
  4. Attaching Planters: Fasten metal ring planter clamps into the shutter frames at staggered heights.
  5. Planting: Insert small potted trailing ivy, cyclamen, or petunias into the ring clamps, letting foliage cascade down the louver panels.

Tips and Variations

  • Tip: Ensure shutters are mounted with louvers angled downward away from the wall so rainwater drains off cleanly instead of pooling inside wood joints.
  • Variation: Mount a small chalk menu board between two flanking shutters to list daily garden harvests or outdoor party menus.

What You Need to Make It

  • Pair of Vintage Wooden Louvered Shutters
  • Exterior Clear Sealer or Pastel Outdoor Paint
  • Heavy-Duty Wall Anchors & Screws
  • Metal Ring Planter Clamps & Clay Pots
  • Cascading Flowering Plants

14. Gothic Arch Stone Nook with Candle Lanterns

Introduction

A medieval-inspired recessed stone alcove featuring a sharp pointed Gothic arch, housing black iron candle lanterns that cast flickering shadows across garden walls at dusk.

What This Idea Means

Gothic architectural elements introduce mystery, drama, and historical grandeur. Framing a recessed niche or wall-mounted shelf with a pointed stone arch creates an intimate sanctuary feel, especially when illuminated by candlelight.

How to Make It

  1. Arch Frame Selection: Source or build a cast stone or polyurethane pointed Gothic arch frame molding.
  2. Wall Installation: Mount the arch frame onto a dark stone or brick wall to surround a recessed niche or sturdy stone floating shelf.
  3. Finish Coating: Apply a stone-wash or dark antiquing glaze over the arch frame to blend seamlessly with surrounding wall masonry.
  4. Lantern Placement: Set a set of three varied-height black iron pillar candle lanterns inside the arched nook.
  5. Candle Option: Use real beeswax pillar candles for authentic flickering flame glow, or high-end outdoor waterproof LED candles with remote timers for safety.

Tips and Variations

  • Tip: Surround the Gothic arch with dark green small-leaf ivy (Hedera helix) to make the stone arch feel like a historic ruin discovery.
  • Variation: Install a small bronze gargoyle or lion head spout inside the arch instead of candle lanterns.

What You Need to Make It

  • Cast Stone or Molded Gothic Arch Frame
  • Sturdy Floating Stone Shelf / Niche Bracket
  • Dark Antiquing Glaze & Paintbrush
  • Black Iron Outdoor Pillar Candle Lanterns
  • Real Beeswax or Waterproof LED Pillar Candles

15. Woven Willow & Grapevine Branch Sculptural Swag

Introduction

An eco-friendly, rustic installation made by weaving flexible willow, grapevine, and birch branches into organic sweeping swirls, accented with dried seed pods and air plants.

What This Idea Means

This concept celebrates raw woodland craft and natural organic forms. Flexible woven branches form a fluid, flowing sculpture that breaks up rigid square fence panels with soft natural curves.

How to Make It

  1. Branch Soaking: Soak long flexible willow or grapevine whips in warm water for several hours until soft and pliable.
  2. Weaving Form: Twist and weave the branches together into an S-curve or sweeping crescent swag shape, binding key structural points with dark jute twine or copper wire.
  3. Drying & Sealing: Allow the woven branch sculpture to dry completely on a flat surface, then spray with a clear exterior matte acrylic varnish.
  4. Botanical Accents: Tuck dried lotus seed pods, pinecones, moss patches, and air plants into the branch weaves.
  5. Wall Mount: Hang the natural sculpture on wall hooks or fence brackets using hidden copper wire loops.

Tips and Variations

  • Tip: Collect fallen birch twigs, grapevine trimmings, or hazel branches from your own garden to make this project entirely free and sustainable.
  • Variation: Intertwine warm fairy light strands through the branch weaves to transform the sculpture into a glowing installation at night.

What You Need to Make It

  • Flexible Willow, Grapevine, or Birch Whips
  • Dark Jute Garden Twine & Pure Copper Wire
  • Clear Exterior Matte Spray Varnish
  • Dried Lotus Pods, Moss & Air Plants
  • Wall Hooks or Cable Mounting Clips

16. Mediterranean Blue & White Ceramic Plate Wall Gallery

Introduction

Inspired by coastal Portuguese and Greek tavernas, a curated gallery of weather-resistant blue-and-white glazed ceramic plates mounted against a crisp white rendered wall brings breezy vacation charm.

What This Idea Means

Bringing plate gallery walls outdoors introduces graphic patterns, crisp color contrast, and coastal Mediterranean energy. Glazed ceramic surfaces withstand rain and reflect daylight beautifully.

How to Make It

  1. Plate Collection: Gather a set of 7 to 11 decorative glazed ceramic plates in varied sizes (ranging from 6 to 12 inches) featuring classic blue-and-white azulejo or floral patterns.
  2. Wall Prep: Paint your exterior wall in a crisp, bright white exterior masonry paint.
  3. Layout Planning: Lay the plates out on the ground first to arrange a balanced asymmetrical oval or diamond gallery grouping.
  4. Hanger Attachment: Affix heavy-duty exterior adhesive wire plate hangers or disc hangers to the back of each ceramic plate.
  5. Wall Installation: Drill masonry holes, insert wall plugs, drive stainless steel screws, and mount the plates following your ground layout.

Tips and Variations

  • Tip: Ensure the adhesive plate hangers used are rated specifically for outdoor moisture and temperature variations to prevent plates falling.
  • Variation: Use vibrant hand-painted Spanish tiles in yellow, orange, and cobalt blue for a sunny Andalusian patio feel.

What You Need to Make It

  • Glazed Blue-and-White Decorative Ceramic Plates
  • Outdoor Heavy-Duty Wire Plate Hangers
  • Crisp White Exterior Masonry Paint
  • Masonry Drill Bit, Plugs & Stainless Screws
  • Measuring Tape & Painter’s Tape

17. Industrial Wrought Iron Wine Rack Vertical Planter

Introduction

Repurposing a vintage wall-mounted metal wine rack to hold small terracotta pots creates an industrial-chic vertical planter for succulents, strawberries, or trailing ivy.

What This Idea Means

Creative upcycling transforms industrial metal storage into functional garden art. The circular or arched bottle loops of a wine rack naturally cradle standard clay terra cotta pots securely against vertical walls.

How to Make It

  1. Rack Preparation: Acquire a heavy wrought iron or steel wall-mounted wine rack (holding 6 to 12 bottles).
  2. Rust Protection: Sand away any flaking rust and coat the frame with a rust-inhibiting matte black or bronze exterior spray paint.
  3. Mounting: Anchor the wine rack vertically onto your brick wall or wooden fence using heavy-duty lag bolts.
  4. Pot Selection: Source small 4-inch terracotta flower pots that fit snugly into the bottle cradles without slipping through.
  5. Planting: Fill pots with potting soil and plant trailing succulents, strawberries, or flowering lobelia, then set them securely into each wine rack loop.

Tips and Variations

  • Tip: Choose pots with a wide top lip collar so the rim rests firmly on the metal bottle support rings.
  • Variation: Place small LED pillar candle lanterns in alternating wine loops instead of plants for an evening lighting feature.

What You Need to Make It

  • Wall-Mounted Wrought Iron Wine Rack
  • Rust-Inhibiting Exterior Spray Paint
  • Heavy-Duty Wall Lag Bolts & Anchors
  • 4-inch Clay Terracotta Flower Pots with Lip Rims
  • Soil & Trailing Plants or Succulents

18. Modern Geometric Hexagon Timber Wall Planters

Introduction

A contemporary honeycomb layout composed of individual cedar hexagonal box frames mounted together, housing small potted plants, moss, and outdoor candles.

What This Idea Means

Honeycomb and hexagonal geometric shapes remain a dominant trend in modern outdoor design. Combining natural wood grain with hollow geometric frames creates a dynamic visual display that can expand organically over time.

How to Make It

  1. Hexagon Construction: Cut 1×4-inch cedar boards into 6 equal segments with 30-degree mitered ends. Join segments using exterior wood glue and brad nails to form a crisp 12-inch wide hexagon frame.
  2. Sealing: Apply an exterior satin clear coat to preserve the warm natural cedar timber grain.
  3. Cluster Design: Connect 3 to 7 individual wooden hexagons together along matching flat sides to form an asymmetrical honeycomb cluster.
  4. Wall Mounting: Fasten the assembled honeycomb cluster onto your garden wall using concealed keyhole brackets or z-clips.
  5. Styling: Set small potted succulents, trailing jade plants, and glass candle cups inside the flat lower shelf ledge of each hexagon module.

Tips and Variations

  • Tip: Leave some hexagon modules hollow (showing the background wall) while filling others with plants to maintain clean visual balance.
  • Variation: Paint the interior back panels of select hexagons in bright pop colors (like turquoise or mustard yellow).

What You Need to Make It

  • 1×4 Cedar Boards & Miter Saw
  • Exterior Wood Glue & Brad Nailer
  • Satin Exterior Clear Timber Sealer
  • Concealed Keyhole Wall Brackets
  • Small Potted Plants & Glass Votives

19. Romantic Rose Gold Metal Flower Wall Sculptures

Introduction

Crafted from weather-resistant powder-coated metal, a collection of 3D metallic flower blooms in rose gold, copper, and bronze adds permanent sculptural sparkle to shaded garden walls.

What This Idea Means

In deep shade garden zones where flowering plants struggle to bloom, 3D metal floral sculptures bring permanent color, shine, and botanical form year-round without sun dependency.

How to Make It

  1. Sculpture Curation: Acquire a set of 3 to 5 metal flower wall sculptures (e.g., stylized lotus or dahlia blooms) featuring layered 3D petals in metallic rose gold, copper, and champagne tones.
  2. Clear Coating: Spray all metal blooms with a UV-resistant clear gloss coat to lock in the metallic sheen and prevent outdoor weathering.
  3. Layout Mapping: Hold paper cutouts matching flower dimensions against your wall with painter’s tape to perfect the cascading arrangement before drilling.
  4. Mounting: Drill masonry anchor holes at marked locations and hang each metal bloom securely onto keyhole slots on its rear base.
  5. Illumination: Aim a ground-mounted solar spotlight upward at the metal wall sculpture to create dramatic metallic reflections at night.

Tips and Variations

  • Tip: Stagger the metal flower sizes (e.g., one large 24-inch bloom flanked by two 12-inch blooms) to build natural visual hierarchy.
  • Variation: Combine metallic copper flowers with live dark green wall ivy climbing around the metal petals.

What You Need to Make It

  • 3D Metallic Flower Wall Sculptures (Rose Gold/Copper/Bronze)
  • UV-Resistant Exterior Clear Gloss Spray
  • Masonry Drill Bit, Plugs & Screws
  • Paper & Painter’s Tape (for layout planning)
  • Ground-Mounted Solar Outdoor Spotlight

20. Oversized Distressed Vintage Wooden Garden Sign

Introduction

A rustic statement piece featuring distressed hand-painted typography on reclaimed barn wood planks, bringing warm cottage personality and storytelling to garden walls.

What This Idea Means

Typography adds narrative personality and nostalgia to outdoor entertaining areas. A hand-crafted wooden sign featuring meaningful garden quotes, family estate names, or vintage botanical motifs anchors cozy seating nooks.

How to Make It

  1. Plank Assembly: Join 3 to 4 reclaimed barn wood planks together using rear cross-battens and exterior wood screws to form a rectangular wood sign board (e.g., 24×48 inches).
  2. Base Paint & Sanding: Apply a thin coat of off-white or sage green chalk paint, then sand heavily across edges and wood grain knots to reveal weathered timber underneath.
  3. Typography Stenciling: Stencil your chosen quote or design (e.g., “Botanical Garden”, “Welcome to the Sanctuary”, or custom family name) using dark charcoal acrylic paint and stencil brushes.
  4. Sealing: Apply two generous coats of matte exterior spar urethane across the front and back to protect timber and paint from moisture.
  5. Mounting: Secure the heavy sign onto your brick masonry or timber boundary wall using heavy-duty z-bar wall hangers.

Tips and Variations

  • Tip: Use a matte exterior sealer rather than a glossy one so the sign remains easy to read in bright direct sunlight without harsh glare.
  • Variation: Attach small iron hooks along the bottom edge of the wooden sign to hang garden tools, watering cans, or dried lavender bundles.

What You Need to Make It

  • Reclaimed Barn Wood Planks & Cross-Battens
  • Chalk Paint, Charcoal Acrylic & Stencil Set
  • Sandpaper & Paintbrushes
  • Matte Exterior Spar Urethane Sealer
  • Heavy-Duty Z-Bar Wall Hangers & Screws


Discover more from DIY IDEAS

Subscribe to get the latest posts sent to your email.