Transforming your dining or coffee table into a stunning focal point doesn’t require a hefty budget or a professional interior designer. Neutral color palettes—ranging from warm creams and earthy taupes to soft linens, bleached woods, and subtle stone grays—bring an air of timeless elegance, calm, and understated luxury to any space. Neutral doesn’t mean boring; rather, it allows texture, form, and natural materials to take center stage.
Whether you are hosting a cozy dinner party, styling your home for a seasonal refresh, or simply looking to elevate your everyday living environment, these 20 aesthetic, amazing, and gorgeous DIY neutral table centerpieces offer endless inspiration. Each idea includes a complete breakdown of what you need, step-by-step instructions on how to make it, professional styling tips, and creative variations to match your personal aesthetic.
Why Choose a Neutral Table Centerpiece?
Neutral centerpieces serve as the ultimate anchor for home decor. By relying on organic textures like jute, dried botanicals, raw ceramics, and warm metals, these designs blend seamlessly with any interior style—whether your home leans toward modern minimalist, rustic farmhouse, Scandinavian, Japandi, or bohemian chic. Furthermore, neutral pieces are effortlessly adaptable; you can easily transition them across seasons by simply swapping out a single stem or adding a subtle seasonal accent.
1. Minimalist Dry Pampa & Eucalypus Ceramic Vase Arrangement
What You Need
- A matte white or cream ceramic vase with an organic, textured shape
- Dried pampas grass plumes (soft beige or cream)
- Preserved silver dollar eucalyptus stems
- Floral shears
How to Make It
- Trim the stems of the preserved eucalyptus to varying heights using floral shears to create natural dimension.
- Arrange the eucalyptus branches as a foundational green layer inside the ceramic vase, allowing a few stems to drape gracefully over the sides.
- Insert the fluffy pampas grass plumes centrally, positioning the tallest plume in the back and shorter, fluffier plumes toward the front.
- Fluff the pampas gently with your fingers and lightly mist with hairspray to minimize shedding.
Tips & Variations
- Tip: Keep the color palette strictly monochromatic by using only cream and muted green tones.
- Variation: Swap pampas grass for dried bunny tails (Lagurus ovatus) for a softer, playful texture.
2. Rustic Wooden Dough Bowl with Pillar Candles & Moss
What You Need
- A hand-carved wooden dough bowl with a natural, distressed finish
- 3 white or ivory pillar candles of varying heights
- Preserved green forest moss
- Small pinecones or dried white limonium sprigs
How to Make It
- Place the wooden dough bowl lengthwise down the center of your dining table.
- Arrange the three pillar candles in a cluster slightly off-center inside the bowl to create visual asymmetry.
- Tuck the preserved green moss firmly around the bases of the candles, filling all gaps in the wooden bowl.
- Scatter a few small pinecones or dried limonium sprigs organically over the moss for added organic detail.
Tips & Variations
- Tip: Use unscented candles if this centerpiece will remain on a table where food is served.
- Variation: Replace moss with smooth white river stones for a cleaner, modern-organic look.

3. Layered Linen Runner with Stacked Ceramic Plates & Trailing Beads
What You Need
- A raw-edge, neutral beige linen table runner
- A stack of 3 handmade ceramic dinner plates in varying cream glazes
- A wooden prayer bead garland with a natural jute tassel
- A single sculptural ceramic knot or orb
How to Make It
- Lay the raw-edge linen runner centered along the length of the table, letting the ends drape naturally.
- Stack the handmade ceramic plates neatly in the exact center of the runner.
- Drape the wooden bead garland artfully across the plate stack, letting the tassel spill over the edge of the table.
- Place the sculptural ceramic knot neatly on top of the uppermost plate.
Tips & Variations
- Tip: Iron the linen runner lightly on low heat before styling if you prefer a crisp look, or leave it naturally wrinkled for casual charm.
- Variation: Swap the ceramic plates for an oversized, low-profile wooden platter.

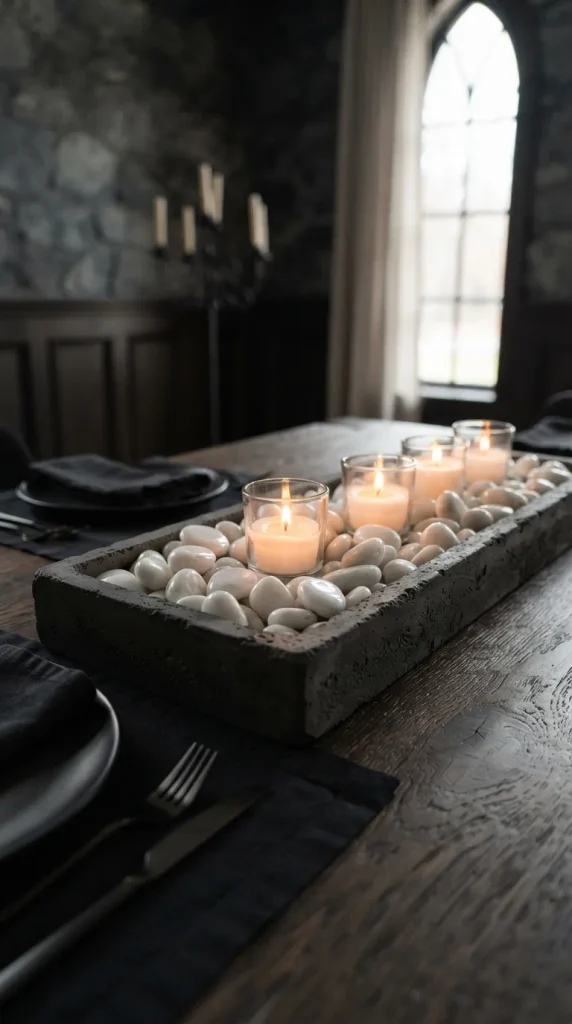
4. Modern Concrete Tray with Floating Tea Lights & River Stones
What You Need
- A rectangular or oval poured concrete tray
- Polished white or gray river stones
- 3 glass votive candle holders
- 3 soy wax tea light candles
How to Make It
- Fill the bottom of the concrete tray evenly with a single layer of polished river stones.
- Nestle the three glass votive holders directly into the bed of stones, spacing them evenly apart.
- Place a soy wax tea light inside each glass holder.
- Light the candles just before guests arrive to cast a soft, ambient glow across the concrete and stone textures.
Tips & Variations
- Tip: Seal the concrete tray with a clear matte sealer to prevent staining from candle wax or dust.
- Variation: Add a few drops of calming essential oil (like eucalyptus or lavender) into the votive holders around the candle base.

5. Woven Rattan Tray with Bundled Wheat & Ceramic Pitcher
What You Need
- A round, flat woven rattan or seagrass tray
- A bundle of dried golden wheat stalks tied with twine
- A classic white ceramic milk pitcher
- A small brass snuffer
How to Make It
- Place the woven rattan tray in the center of your table to establish a warm, tactile base.
- Fill the ceramic pitcher halfway with dry floral foam or crumpled tissue paper to support the stems.
- Trim the wheat stalks to an even height and place them upright inside the pitcher.
- Position the pitcher alongside the brass candle snuffer neatly inside the rattan tray.
Tips & Variations
- Tip: Group items in odd numbers (like a pitcher and a snuffer) to create a naturally balanced vignette.
- Variation: Use dried lavender or oat grass instead of wheat for a softer, cottagecore aesthetic.

6. Asymmetrical Terracotta Pot Cluster with Succulents
What You Need
- 3 small-to-medium terracotta pots with weathered patinas
- A variety of small indoor succulents (e-cheveria, haworthia)
- Fast-draining succulent potting soil
- Top-dressing of coarse white sand or fine gravel
How to Make It
- Fill each terracotta pot with fast-draining soil and plant one primary succulent in each pot.
- Top the soil surfaces with a thin layer of white sand to hide the dirt and create a clean contrast against the reddish-brown clay.
- Cluster the three pots tightly together in the center of the table, mixing their heights by placing one on a small wooden riser.
Tips & Variations
- Tip: Mist the succulents lightly once a week rather than drenching them, as centerpieces on dining tables need minimal moisture.
- Variation: Whitewash the exterior of the terracotta pots with diluted white acrylic paint for a chalky, neutral finish.


7. Glass Cylinder Vases with Floating Candles & Submerged Birch Branches
What You Need
- 3 clear glass cylinder vases of varying heights (e.g., 6, 8, and 10 inches)
- Thin, bendable white birch branches
- Floating disk candles
- Distilled water
How to Make It
- Cut the birch branches so they fit comfortably inside the glass cylinders, curling them slightly.
- Submerge the curled branches inside each vase and fill the cylinders with distilled water up to two inches below the rim.
- Carefully place a floating disk candle on the surface of the water in each vase.
- Light the wicks for a mesmerizing, illuminated water-and-wood centerpiece.
Tips & Variations
- Tip: Use distilled water instead of tap water to prevent mineral clouding on the glass.
- Variation: Drop a few polished white stones at the bottom of the cylinders to anchor the branches.
8. Elevated Paulownia Wood Riser with Neutral Ceramic Botanicals
What You Need
- A low-profile rectangular Paulownia wood riser with short feet
- 2 minimalist cream ceramic bud vases
- Single stems of dried honesty plant (Lunaria) or bleached ruscus
- A small linen scent sachet
How to Make It
- Place the wooden riser in the exact center of your table to lift your decor off the wood surface.
- Place the two ceramic bud vases on opposite sides of the riser.
- Insert 2–3 delicate stems of translucent honesty plant into one vase and a single arching ruscus stem into the other.
- Tuck the linen scent sachet neatly between the vases.
Tips & Variations
- Tip: Elevating decor makes cleaning the table or moving the centerpiece during meals effortless.
- Variation: Use small ceramic oil burners with neutral essential oils instead of bud vases.
9. Bleached Driftwood Branch with Tea Light Cups
What You Need
- A long, smooth piece of bleached driftwood
- 4-5 glass tea light cups
- A hot glue gun and clear glue sticks (optional, for secure placement)
- Tea light candles
How to Make It
- Lay the driftwood branch lengthwise down the middle of your table, testing different angles until it rests stably.
- Identify natural flat spots or shallow hollows along the top of the wood branch.
- Place glass tea light cups into these natural hollows, securing them with a small dot of hot glue if needed.
- Drop a tea light into each glass cup and light them for an organic, woodland-inspired glow.
Tips & Variations
- Tip: Clean the driftwood thoroughly with a damp cloth and let it dry completely before bringing it indoors.
- Variation: Tie small tags of handmade deckled-edge paper with guest initials around the branch for a personalized dinner party setting.
10. Minimalist Metal Hoop Centerpiece with Eucalyptus Wreath
What You Need
- A 12-inch brass or matte black metal craft hoop
- A matching metal display stand
- Faux or preserved seeded eucalyptus sprigs
- Floral wire (matching the hoop color)
How to Make It
- Secure the metal hoop into its slotted display stand.
- Using fine floral wire, attach small sprigs of seeded eucalyptus to the bottom third of the hoop, wrapping tightly to create a half-wreath effect.
- Trim any stray wire ends and fluff the leaves forward to give the foliage depth and dimension.
- Place the stand in the center of the table, running a thin linen runner underneath.
Tips & Variations
- Tip: Keep the foliage asymmetrical—heavy on the bottom left, tapering off upward—for a modern designer look.
- Variation: Wrap fairy lights woven with warm white micro-LEDs through the eucalyptus leaves.
11. Burlap-Wrapped Herb Pots in a Galvanized Metal Tray
What You Need
- A rectangular galvanized metal tray with handles
- 3 small terracotta pots planted with culinary herbs (rosemary, thyme, sage)
- Natural burlap fabric cut into squares
- Twine or jute string
How to Make It
- Wrap each potted herb snugly in a square of natural burlap fabric, bringing the corners up around the rim.
- Tie a length of twine tightly around the burlap-wrapped pots in a neat double knot or bow.
- Arrange the three herb pots side-by-side inside the galvanized metal tray.
- Wipe down any stray soil from the tray rim.
Tips & Variations
- Tip: Fresh herbs not only look wonderfully green and neutral but also release a subtle, clean aroma when brushed against.
- Variation: Use artificial faux potted greenery if natural light near the table is insufficient.
12. Scalloped Travertine Stone Tray with Minimalist Oil Burner
What You Need
- A circular travertine stone tray with a scalloped or smooth edge
- A minimalist cream stone oil burner
- Tealight candle and neutral botanical oil (e.g., white tea or sandalwood)
- A small stack of matches in a glass jar
How to Make It
- Position the travertine stone tray centrally on the table.
- Place the stone oil burner in the middle of the tray.
- Add a few drops of water and botanical oil to the top basin of the burner.
- Place the glass match jar and tea light neatly beside it.
Tips & Variations
- Tip: Travertine features gorgeous natural veining, making every single tray entirely unique.
- Variation: Use the tray to hold a collection of neutral pillar candles of varying heights instead of an oil burner.
13. Woven Abaca Mat with Ceramic Pods & Air Plants
What You Need
- An oval woven abaca or seagrass placemat or small runner
- 3 handmade ceramic seed pods or urchin-shaped vessels in white and beige
- Small live tillandsia (air plants)
- A small spray mister bottle
How to Make It
- Lay the abaca mat flat in the center of the table as your grounding element.
- Arrange the ceramic seed pod vessels in a triangular grouping on top of the mat.
- Nestle one air plant gently inside the opening of each ceramic pod.
- Mist the air plants lightly once a week after removing them temporarily from the centerpiece.
Tips & Variations
- Tip: Air plants require no soil, making them exceptionally clean and low-maintenance for indoor dining tables.
- Variation: Add a few bleached sea shells or smooth pebbles inside the pods alongside the air plants.
14. Stacked Vintage Books with a Ceramic Bust or Orb
What You Need
- 3-4 vintage hardcover books with neutral, clothbound or distressed paper covers (remove glossy dust jackets)
- A small white ceramic or plaster sculptural bust, sphere, or knot
- A sprig of dried olive leaves
How to Make It
- Stack the books horizontally from largest on the bottom to smallest on top.
- Place the ceramic bust or decorative orb directly on top of the book stack.
- Tuck a single dried olive branch into the side of the book stack so the leaves peek out gracefully.
Tips & Variations
- Tip: Check thrift stores for old books with neutral beige, cream, or gray cloth covers.
- Variation: Tie the book stack together with a wide piece of frayed cotton ribbon.


15. Minimalist Glass Hurricane with Sand and Pillar Candle
What You Need
- An oversized clear glass hurricane vase
- Fine cream or tan craft sand (about 2 inches deep)
- A thick ivory pillar candle
- A few dried star anise pods or cinnamon sticks
How to Make It
- Pour the cream craft sand directly into the bottom of the glass hurricane vase, leveling it out smoothly.
- Push the ivory pillar candle firmly into the center of the sand so it stands completely stable.
- Arrange a few star anise pods or cinnamon sticks on top of the sand around the base of the candle.
Tips & Variations
- Tip: Sand acts as a wonderful, natural anchor and protects the glass from wax runoff.
- Variation: Use white sea glass or crushed oyster shells instead of sand for a coastal-neutral vibe.
16. Rustic Wooden Tiered Tray with Neutral Decor Accents
What You Need
- A two-tiered wooden tray with a distressed white-wash or natural wood finish
- Mini white ceramic pumpkins or textured ceramic balls
- Small glass jar with dried lavender or bunny tails
- Folded linen napkins
How to Make It
- Assemble the two-tiered tray according to package instructions.
- On the bottom tier, place the folded linen napkins and a small glass jar filled with dried bunny tails.
- On the top tier, arrange a cluster of 3 mini white ceramic spheres or decorative objects.
- Ensure weight is distributed evenly between the upper and lower tiers.
Tips & Variations
- Tip: Tiered trays maximize vertical space, making them ideal for smaller kitchen islands or narrow dining tables.
- Variation: Swap decor items seasonally (e.g., pinecones in winter, faux eggs in spring).
17. Terracotta Saucer with White Pillar Candles and Succulent Cuttings
What You Need
- A large, wide unglazed terracotta plant saucer (approx. 12 inches)
- 3 white pillar candles of varying diameters
- Short succulent rosettes or moss cushions
- Coarse white gravel
How to Make It
- Fill the inside of the terracotta saucer with a layer of coarse white gravel.
- Place the three white pillar candles in the center of the gravel cluster.
- Tuck fresh succulent cuttings or moss cushions around the outer perimeter of the candles.
Tips & Variations
- Tip: Terracotta saucers are incredibly inexpensive at garden centers and offer a rustic, high-end Mediterranean look.
- Variation: Mist the moss regularly to keep it vibrant and green throughout your dinner gathering.
18. Hanging Glass Terrariums on a Custom Table Stand
What You Need
- A metal tabletop display stand with overhead hooks
- 3 geometric glass teardrop terrariums
- White sand, small air plants, and delicate dried flower heads
- Jute twine for hanging
How to Make It
- Assemble and place the metal tabletop stand along the centerline of the table.
- Add a spoonful of white sand and an air plant into each glass terrarium.
- Suspend the terrariums from the hooks on the stand at varying heights using jute twine.
Tips & Variations
- Tip: This centerpiece adds stunning vertical dimension without blocking eye contact across the table.
- Variation: Place battery-operated fairy light strings inside the glass terrariums for a magical evening glow.
19. Woven Seagrass Basket with Dried Floral Bouquet
What You Need
- A structured, square woven seagrass basket
- A large bundle of dried neutral botanicals (talinum, billy balls, bleached ferns)
- Brown kraft paper for lining the inside of the basket
How to Make It
- Line the inside bottom of the seagrass basket with crumpled brown kraft paper to provide height and stability for stems.
- Gather your dried botanical bundle and trim stems to a uniform length.
- Place the bouquet upright in the center of the basket, letting the textured stems spill softly over the rim.
- Fluff the dried ferns outward for a full, organic silhouette.
Tips & Variations
- Tip: Seagrass baskets bring wonderful tactile warmth and texture to sleek glass or stone dining tables.
- Variation: Use dried cotton stems for a cozy, winter-neutral feel.
20. Monochromatic Stone Pedestal Bowl with Spheres
What You Need
- A low pedestal bowl made of cast stone or weathered ceramic
- 3-4 handmade ceramic and marble decorative spheres in varying shades of cream, taupe, and charcoal
- A subtle linen table runner underneath
How to Make It
- Center the linen table runner and place the stone pedestal bowl right in the middle.
- Arrange the decorative spheres inside the bowl, nesting them together naturally.
- Adjust one sphere slightly higher than the others for a curated, art-gallery aesthetic.
Tips & Variations
- Tip: Keep shapes varied—mix smooth marble balls with textured ceramic spheres for tactile contrast.
- Variation: Fill the pedestal bowl with seasonal fresh fruit like white pears or pomegranates for an edible neutral arrangement.


